My initial setup for mac
Finally, I decided to purchase a Mac, specifically the Mac Mini M2 Pro. Additionally, I will be switching to a MacBook Pro for my job. Now, it’s time to set up the operating system to my liking.
System settings
Mouse > Natural scrollingto disabledKeyboardAdjust key repeat rate to fastest and delay until repeat to short.Keyboard > Keyboard shortcuts > Input sourcesdisable both shortcuts, I don’t need them and one of them collides with VSCode.Keyboard > Keyboard shortcuts > Services > TextdisableConvert text to Simplified chinese and traditional, I want those shortcuts for something more useful for me.- Disable ApplePressAndHoldEnabled, a setting that doesn’t allow you to hold a key to repeat that character multiple times. Go to the terminal and execute this:
defaults write -g ApplePressAndHoldEnabled -bool false. Same command withtrueto enable again.
Finder
Finder is the file explorer for Mac. I will add some configuration for a better productivity.
- Change the view to list and add the column Date modified.
- Go to
Viewand enableShow path barandShow status bar. - Drag and drop my most used folders to the left side for quick access, such as
Github. - In
View, go toCustomize toolbarand get rid of anything I don’t use, like tags, groups, etc. Finder > Settings > Advancedand select Current folder for theWhen performing a searchfield.
Dock settings
Right click on the dock and select Dock settings:
- Enable minimize application into icon.
- Disable Show suggested and recent apps in dock.
Install apps
I usually install these apps:
- Shottr: Free app for taking screenshots and make quick annotations.
- Warp: Improved terminal, with AI.
- Oh My Zsh: Framework for customizing zsh terminal.
- Macpass: Password manager KeePass client for mac.
- Colorslurp: Color picker. I love holding Ctrl + click while moving for hi precision.
- VSCode: My favorite text editor for development.
- Firefox, Chrome, Responsively: Browsers.
- Logi Options+: Software for my keyboard and mouse.
- ChatGPT: The AI tool.
- HyperKey: Convert the Caps Lock or any other unused key to the hyper key, a combination of these 4 keys:
⌃⌥⌘⇧. More information below. - Raycast: Spotlight with steroids. More information below.
- DevToys: Swiss Army knife DevToys for macOS.
- GIMP: Open source image manipulation program.
- Rectangle PRO: Windows management and my favourite feature, App layouts.
Hyperkey
HyperKey is a very basic application that can be a game changer for shortcuts. You can map the very unused caps lock key (or other), to trigger the combination ⌃⌥⌘⇧. This combination is rarely used for any shortcut.
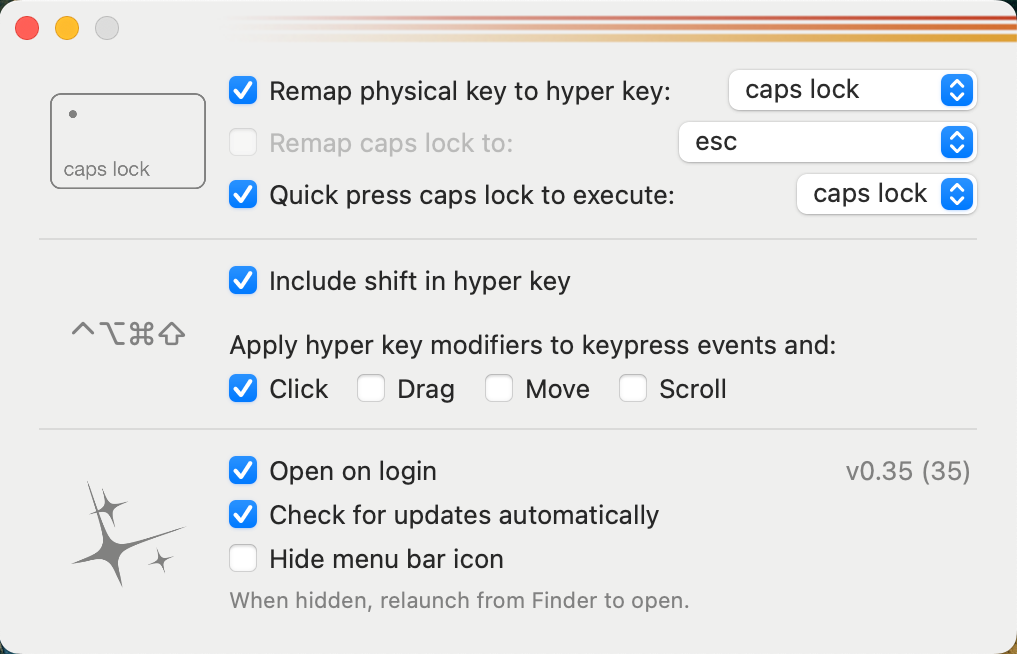
Furthermore, the caps lock key will still work as usual if you press it quickly. This is the configuration I use for Hyperkey:

If you want to achieve the same customization or go beyond, you can use Karabiner. Karabiner is a very powerful application that allows you to customize your keyboard in macOS. There are a lot of crazy combinations and things you can achieve, but for simplicity I am using Hyperkey for now.
Raycast
Raycast is an application that is an enhanced version of the native Spotlight. In my opinion Raycast implements some of the missing functionalities that Mac should bring out of the box, Clipboard manager, Windows management and lot of stuff that you can add in form of plugins.
First thing I do is mapping Raycast to the default shortcut for Spotlight, Command + Space. To do that, go to System Preferences > Keyboard > Shortcuts > Spotlight and disable the keyboard shortcut. Then go to Raycast settings and record the hotkey using Command + Space and you are good to go.
Some extensions I installed:
- Colorslurp.
- Google translate.
- Ruler.
- GIF Search.
- Lorem Ipsum.
- Change case.
- ray.so
- brew
Shortcuts
Useful predefined shortcuts and some defined by myself to improve productivity.
Apps management
⌘ + M: Minimize⌃ + ⌘ + F: Toggle full screen⌘ + W: Close app⌘ + Q: Kill app⌘ + H: Hide app⌥ + ⌘ + H: Hide all apps except focused⌥ + ⌘ + W: Close all windows for an app⌥ + ⌘ + ESC: Force quit apps.F11: Show desktop.
Screenshots
⌘ + ⌃ + 1: Capture screen (Shottr)⌘ + ⌃ + 2: Capture area (Shottr)⌘ + ⌃ + 3: Capture screen (Native)⌘ + ⌃ + 4: Capture area (Native)⌘ + ⌃ + 5: Capture video (Native)
Windows management
Custom shortcuts defined in Raycast:
⌘ + ⌥ + Left: Move to left (Cycle)⌘ + ⌥ + Right: Move to right (Cycle)⌘ + ⌥ + Up: Move to up (Cycle) Note: Conflict with VSCode shortcut⌘ + ⌥ + Down: Move to down (Cycle) Note: Conflict with VSCode shortcut⌘ + ⌥ + C: Center (Cycle)⌃ + ⌘ + ⌥ + C: Center⌘ + ⌥ + F: Maximize⌘ + ⌥ + Del: Restore⌘ + ⌥ + +: Larger⌘ + ⌥ + -: Smaller
Clipboard history
⌃ + ⌥ + V: Clipboard history in Raycast
Hyper key shortcuts
⌃ + ⌥ + ⌘ + ⇧ + F: Firefox⌃ + ⌥ + ⌘ + ⇧ + C: Chrome⌃ + ⌥ + ⌘ + ⇧ + V: VSCode⌃ + ⌥ + ⌘ + ⇧ + W: Warp⌃ + ⌥ + ⌘ + ⇧ + S: Slack⌃ + ⌥ + ⌘ + ⇧ + Enter: Confetti (Raycast extension)